

Turn On Security When You Create a WordPress Site
Updated November 14, 2026 · 5 min read
You can protect a new WordPress site from its first minute. The WordPress install page has a Security row with three options: Site Security Pro (powered by Patchstack), 8G Firewall and BetterShield. Switch on the ones you want, finish creating the site, and xCloud turns them on for you once the site is ready.
This saves a second trip to the site’s Security page after every new site. Agencies that create many sites can also make each option start on for the whole team (see Choose what new sites start with).
| Option | What it does | Cost |
|---|---|---|
| Site Security Pro | Blocks attacks on known vulnerabilities in your plugins and themes before the official fix is out. | Paid add-on, first 30 days free while the offer runs |
| 8G Firewall | Blocks common attacks, bad bots and malicious requests before they reach WordPress. | Included |
| BetterShield | Stops brute-force logins and bans attackers at the server firewall. | Included |
Before you start
- You are creating a WordPress site on a server you have already connected to xCloud. See how to create a site with xCloud for the full flow.
- Site Security Pro shows on the install page only if you can buy add-ons for the server’s team. If you don’t see it, ask your team owner.
- Sites created from a snapshot don’t have the Security row. Turn the options on from the site’s Security page after it is created.
Step 1: Find the Security row
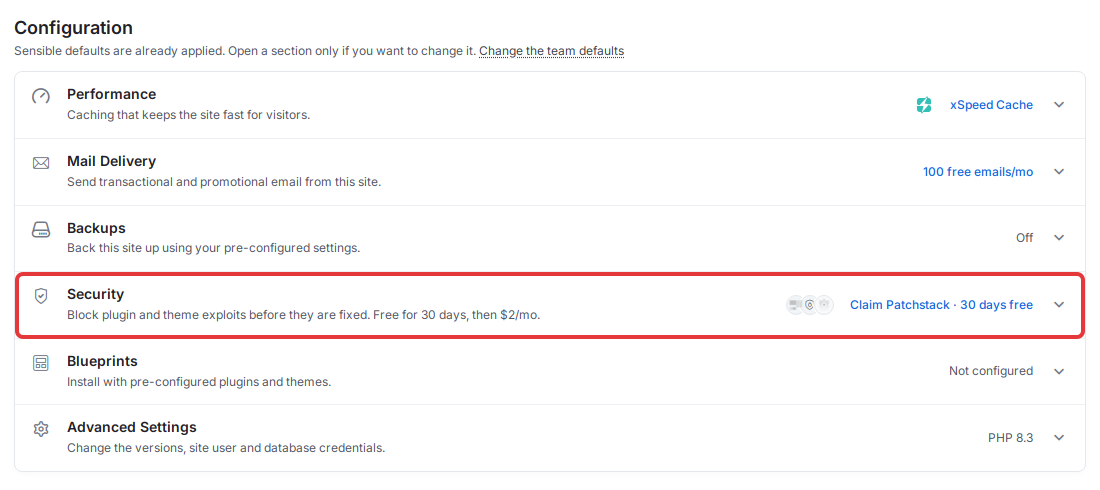
On the WordPress install page, scroll to Configuration. The Security row is in that section, after Backups if you can see the team’s backup settings.
While Site Security Pro’s first month is free, the closed row shows the current offer and reads Claim Patchstack · 30 days free. The small icons stay grey until an option is on. When the first month isn’t free, the row lists the options that are on, or Off.
Step 2: Open the row and switch on what you want
Click the Security row to open it. Site Security Pro is on top, with 8G Firewall and BetterShield side by side below it. All three are off unless your team changed the defaults.
Turn on the switch for each option you want. You can pick any mix: for example, only 8G Firewall and BetterShield, which cost nothing extra.
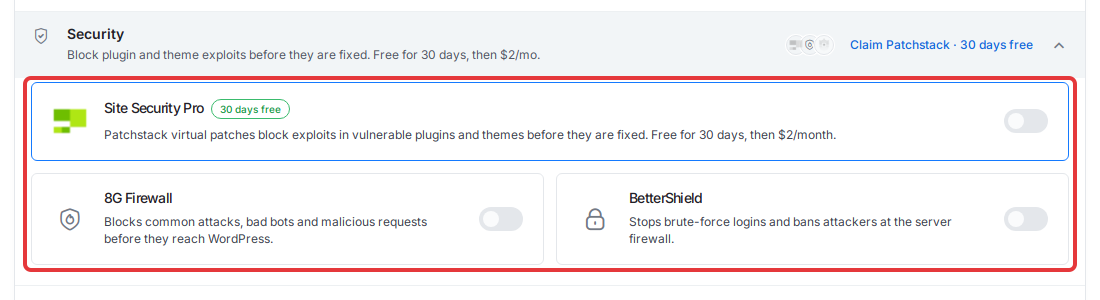
The price after the free month is the current offer shown on the page, in the Site Security Pro card. Check it there before you continue.
Step 3: Check the summary and create the site
Close the row to check your choices. With Site Security Pro on during the free month, the row reads Claimed Patchstack · 30 days free. Any other option you turned on is named first, for example 8G Firewall, BetterShield · Claimed Patchstack · 30 days free.

Click Next and finish creating the site as usual.
What happens after the site is created
xCloud applies your choices in the background once the site is ready. Each option ends with its own message in the dashboard, on whichever page you are on:
- 8G Firewall turns on right away. You see “8G Firewall is on for” your site.
- BetterShield starts installing. You see “BetterShield is being installed on” your site, and you can follow it on the site’s Security page.
- Site Security Pro is added only while its first month is free, and billed to the site’s team after that. On a demo site it starts about 3 minutes after the site is ready, because Patchstack can’t reach a brand-new demo domain any sooner.
If an option can’t be turned on, a message says so. Most of these messages point you to the site’s Security page. 8G Firewall is skipped if the site’s web server settings don’t allow it, for example when it already uses the 7G firewall. The site itself is created either way, and you can turn the option on later from:
If you skipped Site Security Pro
While the free month is on offer, xCloud may email the person who created the site about an hour after it is ready. A team gets at most one of these emails a week. The Add Site Security Pro for free button opens a confirmation on the site’s overview, and nothing is added until you confirm.
Choose what new sites start with
A team can decide where each option starts on the install page. Open Settings, then Site Install under Defaults. The page is also linked from the install page: click Change the team defaults under Configuration.
After Blueprints you’ll find three switches: Site Security Pro, 8G Firewall and BetterShield. All three are off by default. Turn on the ones your team wants and click Save Settings.

A switch turned on here only pre-ticks that option on the install page. The person creating the site can still switch it off. Site Security Pro starts on only where it is offered, and with it on, every new site starts its 30-day free month and is billed monthly after that.
Frequently asked questions
Are the security options on by default?
No. Site Security Pro, 8G Firewall and BetterShield all start off, unless your team turned one on in Settings → Site Install. Even then, the person creating the site can switch it off.
Will I be charged for Site Security Pro if I switch it on here?
xCloud adds it from the install page only while its first month is free. After the free month it is billed monthly to the site’s team at the price shown on the page. You can turn it off any time from the site’s Security page.
What if one of the options could not be turned on?
You get a message that says so, and you can turn that option on later from the site’s Security page. The site itself is created either way.
I skipped Site Security Pro. Can I still get the free month?
Yes, while the offer runs. You can add it from the site’s Security page at any time. xCloud may also send one email about an hour after the site is ready, with a button that opens a confirmation on the site’s overview. Nothing is added until you confirm.
If you run into any issues while turning on security for a new site, feel free to reach out to our support team.