

How to Deploy Nod by n8n on Your Own Server with xCloud
Updated November 18, 2026 · 8 min read
To deploy Nod by n8n with xCloud, create a server, choose Agentic and then Nod, pick a plan and select Pay & Deploy. xCloud builds Nod on the server, gives it an HTTPS address and shows you a sign-in token. You open Nod, paste the token and connect your own AI model.
Nod is available to every xCloud account. You can run it on an xCloud Managed server or on a server from your own cloud provider. This guide covers both, then shows how to update Nod, back it up and move it to your own domain.
What is Nod by n8n?
Nod is a free, open source personal AI assistant from the team behind n8n, released under the Apache 2.0 license. It has its own browser and workspace, so it can finish jobs on real websites, and it asks before it acts for you.
Nod is a separate app from the n8n workflow tool. If you want workflow automation instead, see how to deploy n8n with xCloud or n8n hosting.
Nod only keeps working while the computer that runs it is on. Scheduled tasks stop when a laptop sleeps, which is why n8n’s own guide suggests hosting Nod on a server to keep it always on.
Early preview: n8n calls Nod a research preview, and xCloud labels it an early preview. Its releases can change how things work, so take a backup before each update.
What you need before you start
| You need | Detail |
|---|---|
| An xCloud account | Nod runs on an xCloud Managed server or on your own server. It is not offered through white-label reseller accounts. |
| Enough memory | Nod’s own minimum is 8 GB RAM. xCloud sets it up on plans from 6 GB. |
| An AI model account | Nod uses your own model provider, such as OpenAI, Anthropic, Google Gemini or OpenRouter. Your provider bills you directly. You add the key inside Nod after setup, not in xCloud. |
| About 15 minutes | xCloud builds Nod on the server, which adds about 10 to 15 minutes to setup. |
One Nod server serves one person. There is no sign-up page and no second user.
Nod server requirements
n8n suggests a starting size for a Nod server. xCloud follows it and marks plans that fall short.
| Resource | Nod’s suggested starting size | On xCloud |
|---|---|---|
| Memory | 8 GB | Plans from 6 GB. The smallest plan with 8 GB or more is marked Recommended. |
| CPU | 2 cores | Set by the plan you pick |
| Disk | 50 GB | Set by the plan you pick |
n8n calls this “a starting size, not a measured minimum”. Browser tasks that run at the same time need more capacity, so choose a larger plan if you plan to give Nod a lot of work.
Step 1: Start a new xCloud Managed server
Log in to your xCloud dashboard, go to Servers and select New Server. Choose xCloud Managed.
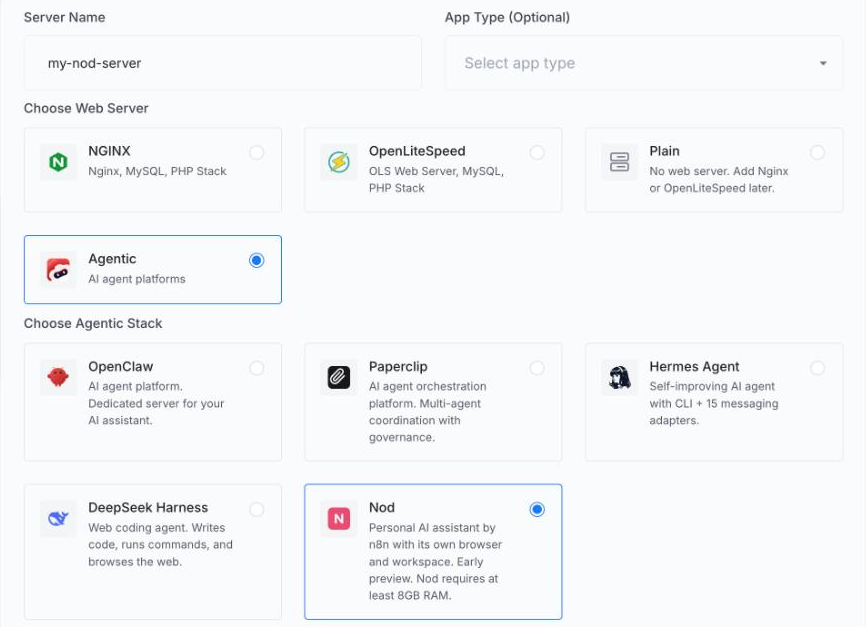
On the Set Up Your Server With xCloud page, enter a name in the Server Name field. Server Tag and App Type are optional, so you can leave them empty.
To use a server from your own cloud provider instead, skip to Deploy Nod on your own server.
Step 2: Choose the Agentic stack and select Nod
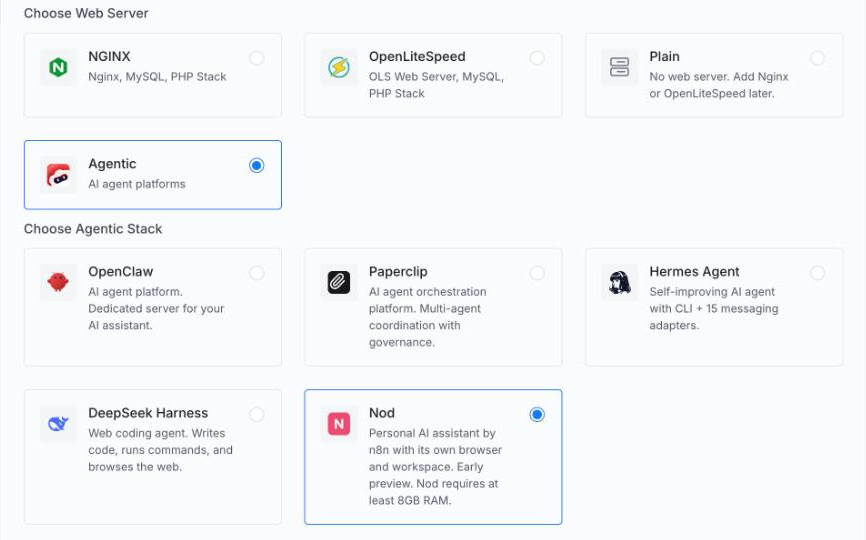
Under Choose Web Server, select Agentic. A second row named Choose Agentic Stack appears. Select Nod.
Step 3: Pick a server size and region
Under Server Size, pick a plan. The plan marked Recommended is the smallest one with the 8 GB RAM Nod asks for. If you had a smaller plan selected when you chose Nod, xCloud moves the selection to it.
A smaller plan carries the label Nod requires 8GB RAM. You can still pick it, but Nod may run slowly or stop when memory runs out. If billing-period tabs such as 1 Month, 12 Months and 24 Months appear above the table, use them to choose how you are billed.
Next, choose a location under Region. A greyed-out region marked Out of stock can’t be selected for the plan you picked. Choose another region, or switch plans to see where that plan is available.
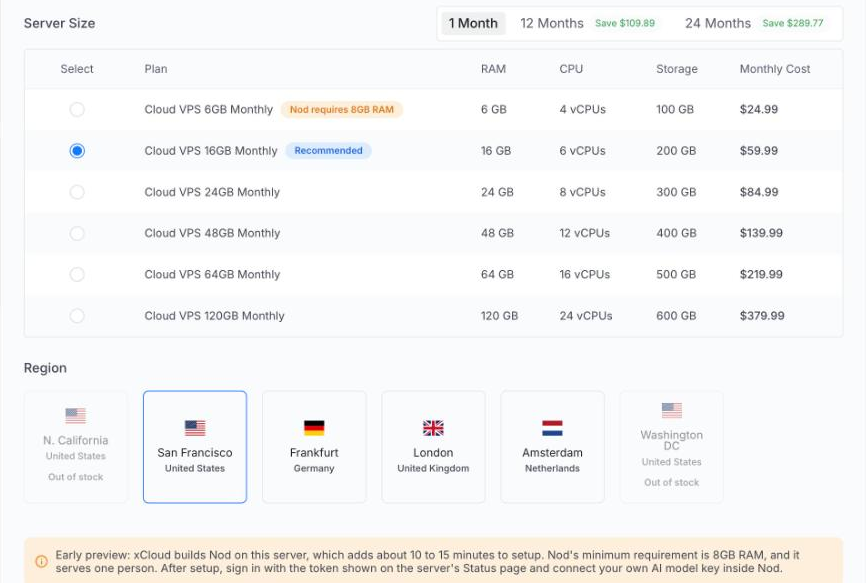
Below the regions, an Early preview note repeats the key points: setup takes longer because Nod is built on the server, Nod’s minimum is 8 GB RAM, it serves one person, and you sign in with a token after setup.
The form has no AI provider or messaging fields for Nod. You set those up inside Nod later.
Step 4: Review the order and deploy
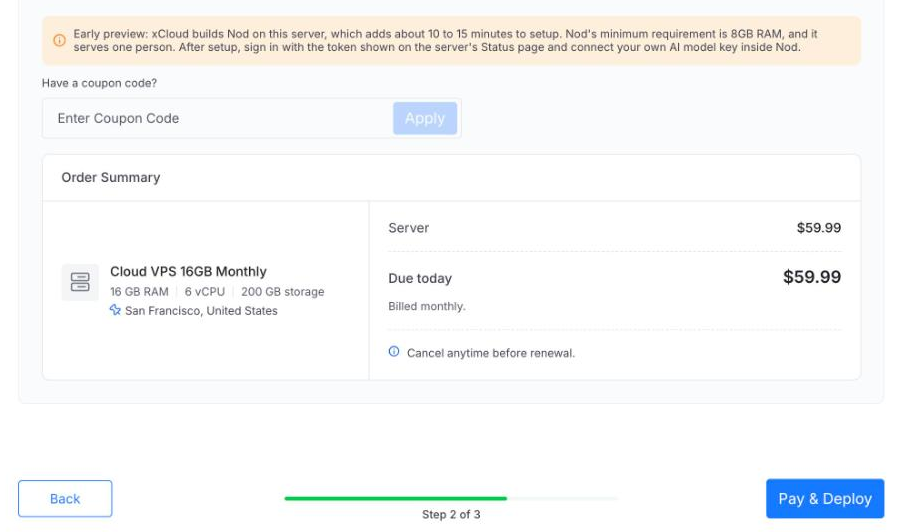
Check the Order Summary. It shows the plan, its memory, CPU and storage, the region and the amount due today. If you have a coupon, enter it in Enter Coupon Code and select Apply.
When everything looks right, select Pay & Deploy.
Step 5: Wait while xCloud builds Nod
xCloud now sets up the server and shows its progress. The stages are:
- Connecting to Server
- Configuring Server
- Installing Nod, which includes Building Nod (this takes several minutes)
- Finishing Up
- Setting Up Nod Address, which ends with Nod Ready!
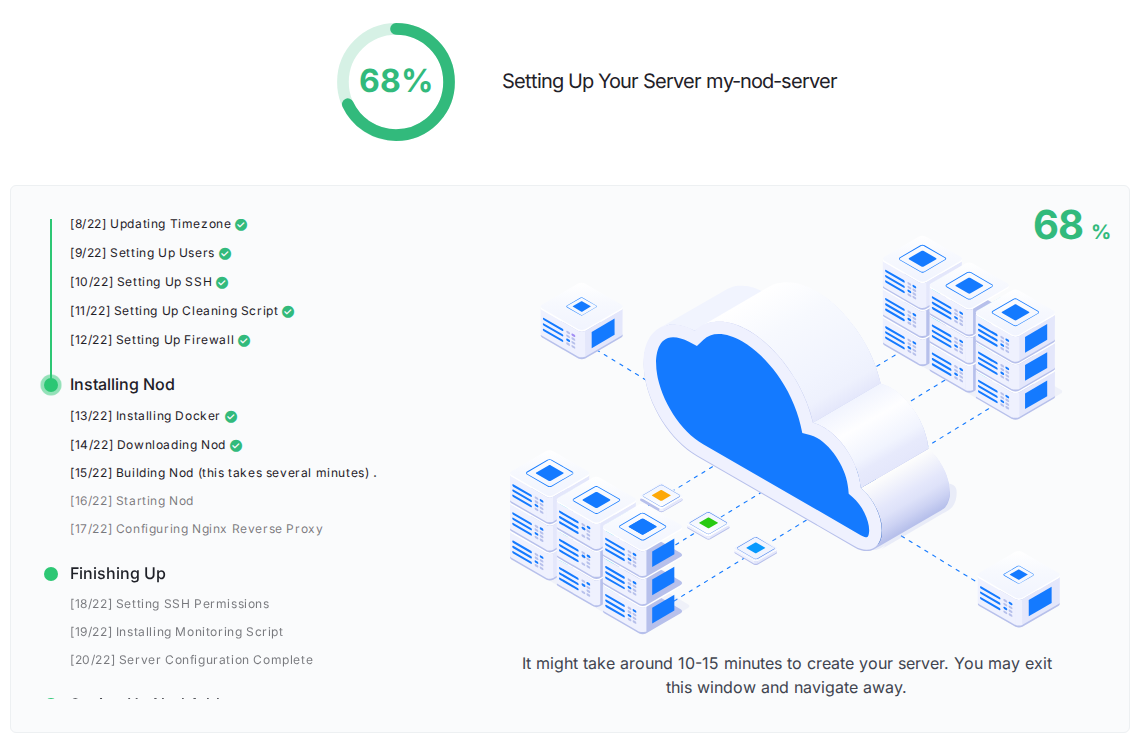
The build is the slow part. You can leave the page and come back.
When setup finishes, Nod has its own address that looks like nod-ab12cd34.xc1.app, with HTTPS already on.
Step 6: Open Nod and sign in with your token
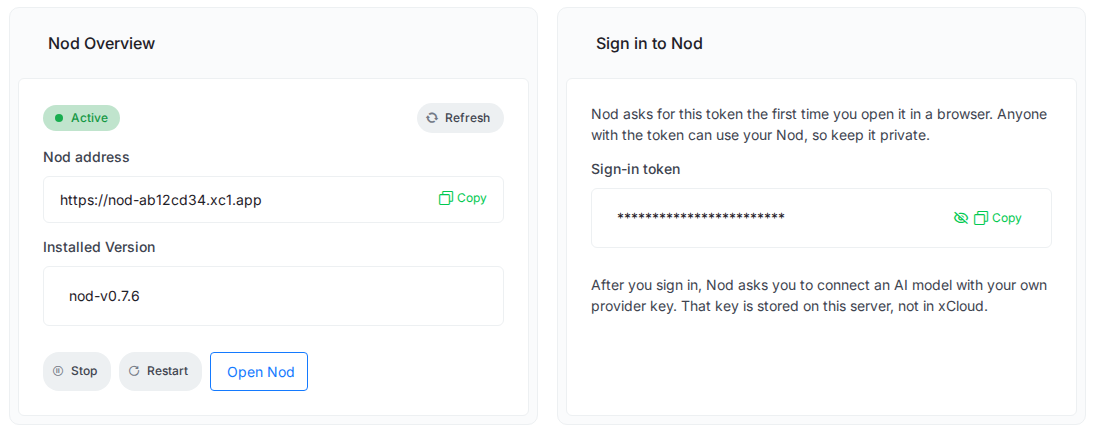
Open the server and go to Status in the left menu. You can also select the Nod Overview card on the server’s Overview page.
The Nod Overview card shows the Nod address, the Installed Version and whether Nod is running. It also has Stop, Restart and Open Nod.
To sign in:
- In the Sign in to Nod card, find the Sign-in token. It is hidden by default. Show it or copy it with the icons beside the field.
- Select Open Nod. Nod opens in a new tab.
- Paste the token when Nod asks for it.
Nod asks for the token the first time you open it in a browser. Anyone with the token can use your Nod, so keep it private.
Step 7: Connect your AI model
After you sign in, Nod starts its own setup. It asks you to connect an AI model with your own provider key. That key is stored on your server, not in xCloud.
Choose a provider from the list, or select More providers to search all supported services. Nod supports OpenAI, Anthropic, Google Gemini, OpenRouter and many more. n8n’s Connect a model guide lists the credentials each provider needs.
Setup also offers a few optional steps, such as connecting your email. You can skip them and add them later from Apps in Nod’s sidebar. When setup ends, Nod opens the chat and you can give it its first task.
To talk to Nod from Telegram or WhatsApp, open Channels in Nod’s sidebar and select Connect. n8n’s Telegram and WhatsApp guide has the steps.
Deploy Nod on your own server
You can also run Nod on a server from your own cloud provider, such as Hetzner, DigitalOcean or AWS. xCloud installs and manages Nod on it the same way.
The server needs:
- Ubuntu 24.04 LTS x64, freshly installed. Ubuntu 26.04 is not supported for AI agent servers yet.
- At least 6 GB RAM. Nod’s own minimum is 8 GB, so pick 8 GB or more if your provider offers it.
- Root SSH access, and nothing else installed on it. Nod uses the whole server.
To connect it:
- Go to Servers, select New Server and choose Bring your own VPS provider.
- Select your provider, or Any to connect a server you already created.
- On the Connect Your Existing Server form, enter a Server Name, select Agentic and then Nod.
- Enter the server’s IP Address, SSH Port and SSH Username, then choose your plan.
- Under SSH Authentication, copy the command shown and run it on your server to add the xCloud key.
- Tick I have created a new server on my provider and select Create.
Before xCloud saves the server, it connects over SSH and checks the Ubuntu version and the memory. A server with less than 6 GB RAM is refused with AI agent servers require a VPS with at least 6 GB RAM. After that, setup continues from Step 5. For the general steps, see how to connect a server from any provider.
Manage Nod from the xCloud dashboard
The left menu of a Nod server has these pages:
| Page | What you do there |
|---|---|
| Overview | Jump to every other page from one set of cards. |
| Domain and SSL/HTTPS | Change the address and manage the certificate. |
| Status | Open Nod, see the sign-in token and version, and stop, start or restart Nod. |
| Logs | Read the Nod Log, Nginx Access Log and Nginx Error Log. |
| Updates | Move Nod to a newer release. |
| Nod Backups | Back up and restore Nod’s data. |
| Security, Monitoring and Settings | Manage the firewall, watch server usage and change server settings. |
Update Nod to a newer release
Go to Updates. The Nod version card shows the release that is installed. Select Check for Updates to look for a newer one.
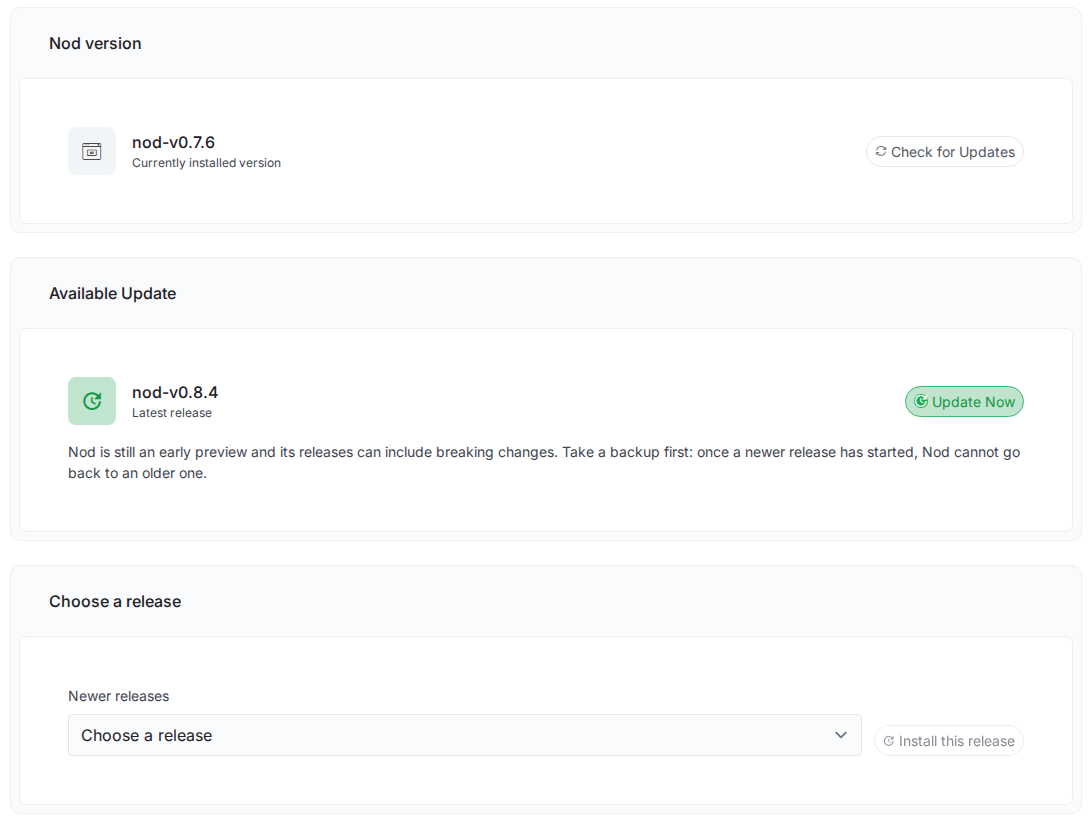
When a newer release exists, the Available Update card shows it. Select Update Now, then confirm with Update in the Update Nod? window.
When more than one newer release exists, a Choose a release card also appears. Pick a release under Newer releases and select Install this release to move to that one instead of the latest. Only newer releases are listed.
Read this before you update:
- You can’t go back. Once a newer release has started, Nod cannot return to an older one.
- Take a backup first. Nod is an early preview, and its releases can include breaking changes.
- Nod is unavailable for a few minutes while it is rebuilt on your server. You can leave the page.
Back up and restore Nod
Go to Nod Backups. Backups go to a storage provider you connect, such as S3 or SFTP, so add one first if you see No storage providers configured yet.
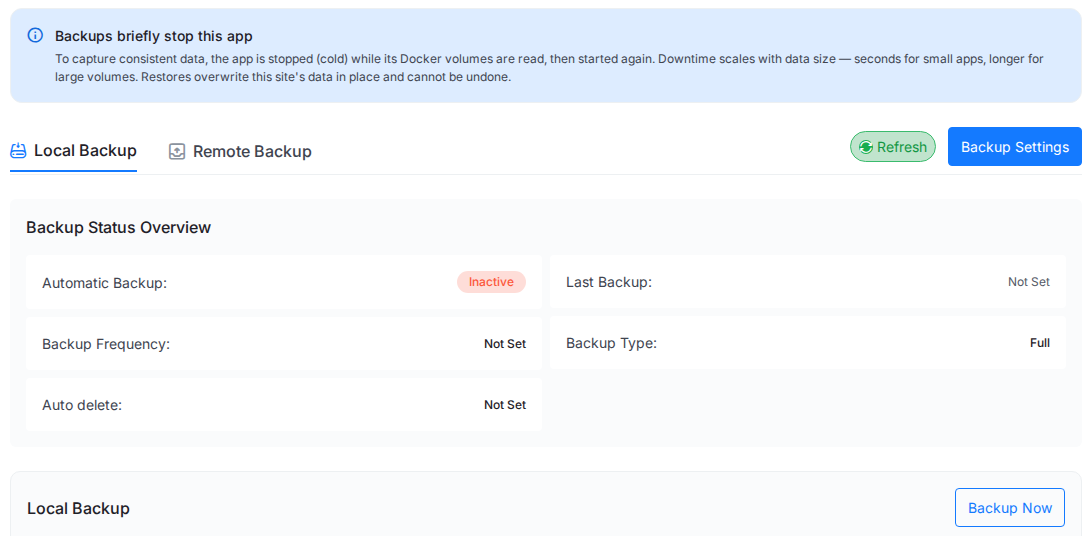
Select Backup Now to take a backup, or Backup Settings to change how backups are taken. Nod stops for a short time while its data is copied, then starts again.
To restore, select Restore next to a backup, type the site name to confirm and select Restore now. A restore replaces Nod’s current data and cannot be undone. Nod is stopped while its data is restored and its containers are rebuilt, which takes about 10 minutes.
A backup keeps working after you change Nod’s domain. When you restore an older backup, xCloud points Nod at the site’s current domain again, so it opens as before.
For the full steps, see how to back up and restore Docker apps.
Use your own domain for Nod
Nod works on the address xCloud gives it. To use your own domain, such as nod.example.com:
- Point the domain’s DNS at your server’s IP address.
- Go to Domain, select Change next to Primary Domain, enter the new domain and select Save.
- Go to SSL/HTTPS and make sure the domain has a certificate.
xCloud tells Nod about the new address for you, because Nod only answers on the address it was given. Nod also only works over HTTPS. If no certificate covers the new domain yet, the Domain and SSL/HTTPS pages say No certificate covers these domains yet, so they open over HTTP only, without HTTPS, and the Status page hides Open Nod until you add one.
See how to change the primary domain of a site for more detail.
Done with Nod? Rebuild the server instead of deleting it
If you stop using Nod, or want to try a different agent such as OpenClaw or Hermes Agent, you don’t have to delete the server and buy a new one.
- Open the server and go to Settings → Rebuild Server.
- Choose what to run next.
- Type the server name to confirm, then select Rebuild.
Rebuilding erases everything on the server and cannot be undone, so take any backups you need first. For the full steps, see how to rebuild a server with xCloud.
Frequently asked questions
What is Nod by n8n?
Nod is a free, open source personal AI assistant from the team behind n8n. It has its own browser and workspace, works across your apps and the web, and asks before it acts for you. It runs on a computer or server you control, with the AI model you choose.
How much RAM does a Nod server need?
Nod’s own minimum is 8 GB RAM, and xCloud marks the smallest plan with 8 GB or more as Recommended. xCloud can also set Nod up on a 6 GB plan, which is labelled Nod requires 8GB RAM: it works, but Nod may run slowly or stop when memory runs out.
Can I run Nod on a server from my own cloud provider?
Yes. Connect a fresh Ubuntu 24.04 server with at least 6 GB RAM from any provider, choose Agentic and then Nod, and xCloud installs Nod on it. Ubuntu 26.04 is not supported for AI agent servers yet.
Do I need n8n to use Nod?
No. Nod is its own app, made by the team behind n8n. It is not the n8n workflow tool and it is not the n8n AI Assistant, so you don’t need an n8n site to run it.
Where do I find the Nod sign-in token?
Open your Nod server in xCloud, go to Status and look at the Sign in to Nod card. Show the Sign-in token or copy it from there. Anyone with the token can use your Nod, so keep it private.
Can I go back to an older Nod release after an update?
No. Once a newer release has started, Nod cannot go back to an older one. Take a backup from Nod Backups before you select Update Now.
That is how you deploy Nod by n8n on your own server with xCloud. For other agents you can run the same way, see AI agent hosting.
If you run into any issues during the deployment process, feel free to reach out to our support team.